Okay, Here We Go: The First Jerry Meandering Panel
P001: The First Terrain Layer
This is the first actual panel for Jerry Meandering, my attempt at a watercolor version of Jerry mapping: a rule-driven, ever-growing mapmaking practice inspired by Jerry Gretzinger’s Jerry’s Map. Jerry’s map is a huge imagined world that has grown for decades through a mix of drawing, chance, and instructions from a custom card deck. I still want to make cards eventually, but the thing that finally got me moving was Pekka Marjamäki’s Suolenkainen map posts, especially “Creating a Unique Procedurally Generated Map: An Artistic Journey Inspired by Jerry Gretzinger” and “The First Tiles: A Proof of Concept”. Those posts made the dice feel like the obvious starting point: use randomness now, stop waiting for the perfect deck, and let the rules develop by actually making the map.
The first panel is P001. The first session is S001. Coordinates: [0,0]. Layer: Terrain.
This is the origin panel, so anything I make after this can grow from it, get placed beside it, or eventually make this first piece look wrong in retrospect.
The Dice I’m Using
For now, the system uses the dice I actually have.
The current roles are:
| Die | Role |
|---|---|
| White d6 | Watercolor move |
| Green d6 | Land / shore feature |
| Tan/Green d6 | Shape / placement |
| Yellow d6 | Amount / consequence |
| Black d6 | Line / edge / interruption |
| Small clear red d6 | Quadrant / direction |
| Metal fantasy die | Meta / special action |
The metal fantasy die became the meta die because it obviously wanted the job. It looks like it belongs slightly outside the map, like a little ritual object. The rest of the dice are just the dice I had around. A more logical color system can come later if I need one.
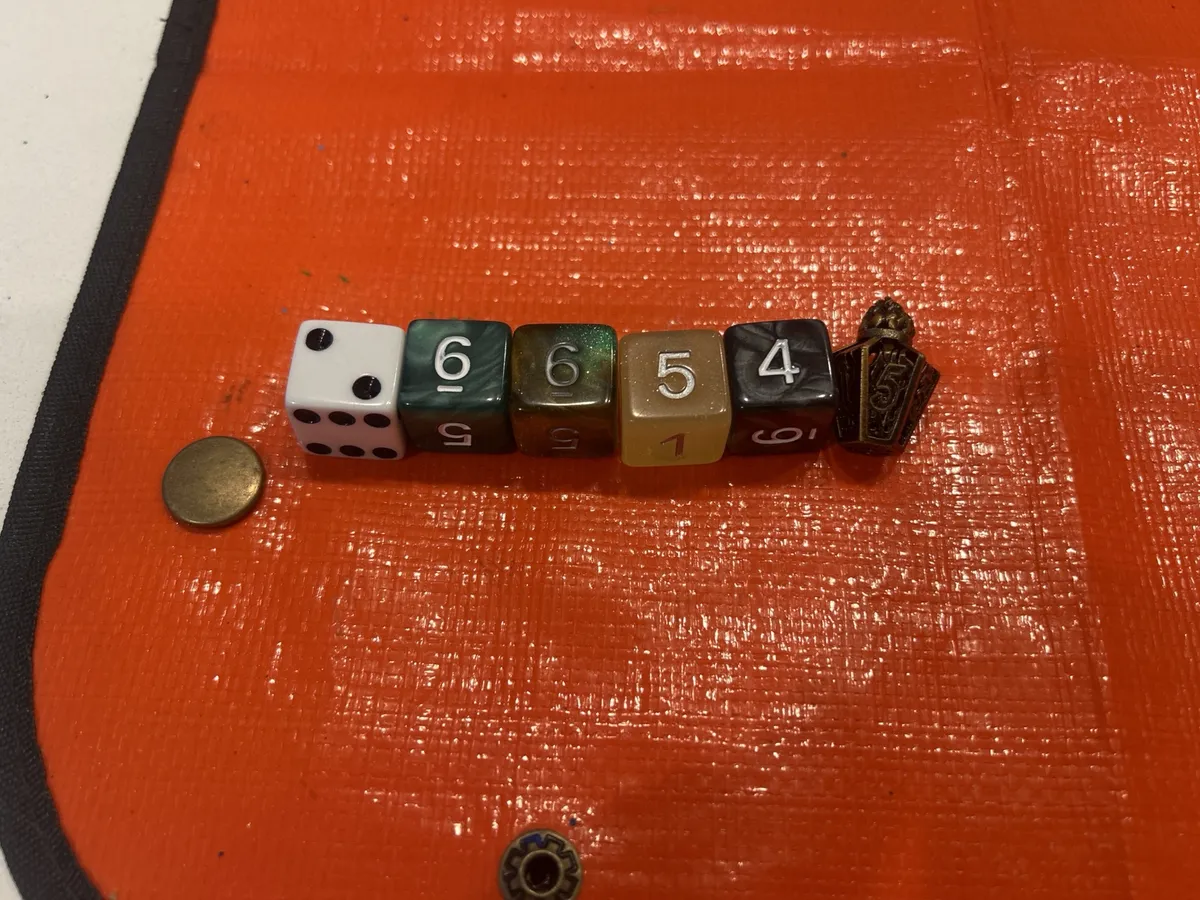
The First Roll
The first roll was:
White 2
Green 6
Tan/Green 5
Yellow 6
Black 4
Metal 5
Or, in shorthand:
W2 G6 T5 Y6 B4 M5
The total was:
2 + 6 + 5 + 6 + 4 + 5 = 28
28 × 10 = 280°
So the base angle for this panel was 280°, which basically gave me a weird slanted axis to work from.
The Current Tables
These are the version 0.1 tables. They will change as I figure out what is actually useful.
White d6: Watercolor Move
| d6 | Watercolor Move |
|---|---|
| 1 | Light wash |
| 2 | Wet-on-wet |
| 3 | Wet-on-dry |
| 4 | Lift |
| 5 | Drybrush |
| 6 | Glaze / darken |
Green d6: Land / Shore Feature
I changed this table while working. A generic “feature” table was too broad for the first map. Right now I need the system to help me find land, water, shoreline, and coast.
| d6 | Land / Shore Feature |
|---|---|
| 1 | Open water |
| 2 | Shoreline edge |
| 3 | Landmass |
| 4 | Low wet ground |
| 5 | High ground |
| 6 | Passage / break |
Tan/Green d6: Shape / Placement
| d6 | Shape / Placement |
|---|---|
| 1 | Central |
| 2 | Edge-bound |
| 3 | Crossing |
| 4 | Clustered |
| 5 | Stretched |
| 6 | Scattered / broken |
Yellow d6: Amount / Consequence
| d6 | Amount / Consequence |
|---|---|
| 1 | Tiny |
| 2 | Small |
| 3 | Medium |
| 4 | Large |
| 5 | Repeat |
| 6 | Bleed / consequence |
Black d6: Line / Edge / Interruption
| d6 | Line / Edge / Interruption |
|---|---|
| 1 | Soft edge |
| 2 | Hard edge |
| 3 | Broken edge |
| 4 | Texture marks |
| 5 | Boundary line |
| 6 | Interruption |
Metal Die: Meta / Special Action
| d6 | Meta Action |
|---|---|
| 1 | Repaint |
| 2 | Shuffle |
| 3 | Annotate |
| 4 | Deck Work |
| 5 | Card seed |
| 6 | Prepare |
Small Red d6: Quadrant / Direction
| d6 | Direction Result |
|---|---|
| 1 | Quadrant 1 |
| 2 | Quadrant 2 |
| 3 | Quadrant 3 |
| 4 | Quadrant 4 |
| 5 | Axis / center line |
| 6 | Edge of page |
So the first roll translated to:
| Roll | Meaning |
|---|---|
| W2 | Wet-on-wet |
| G6 | Passage / break |
| T5 | Stretched |
| Y6 | Bleed / consequence |
| B4 | Texture marks |
| M5 | Card seed |
Labeling the Back
Before painting anything, I labeled the back of the paper:
P001
S001
6/26/26
[0,0]
Terrain Layer
Base Angle: 280°
W2 G6 T5 Y6 B4 M5
N →
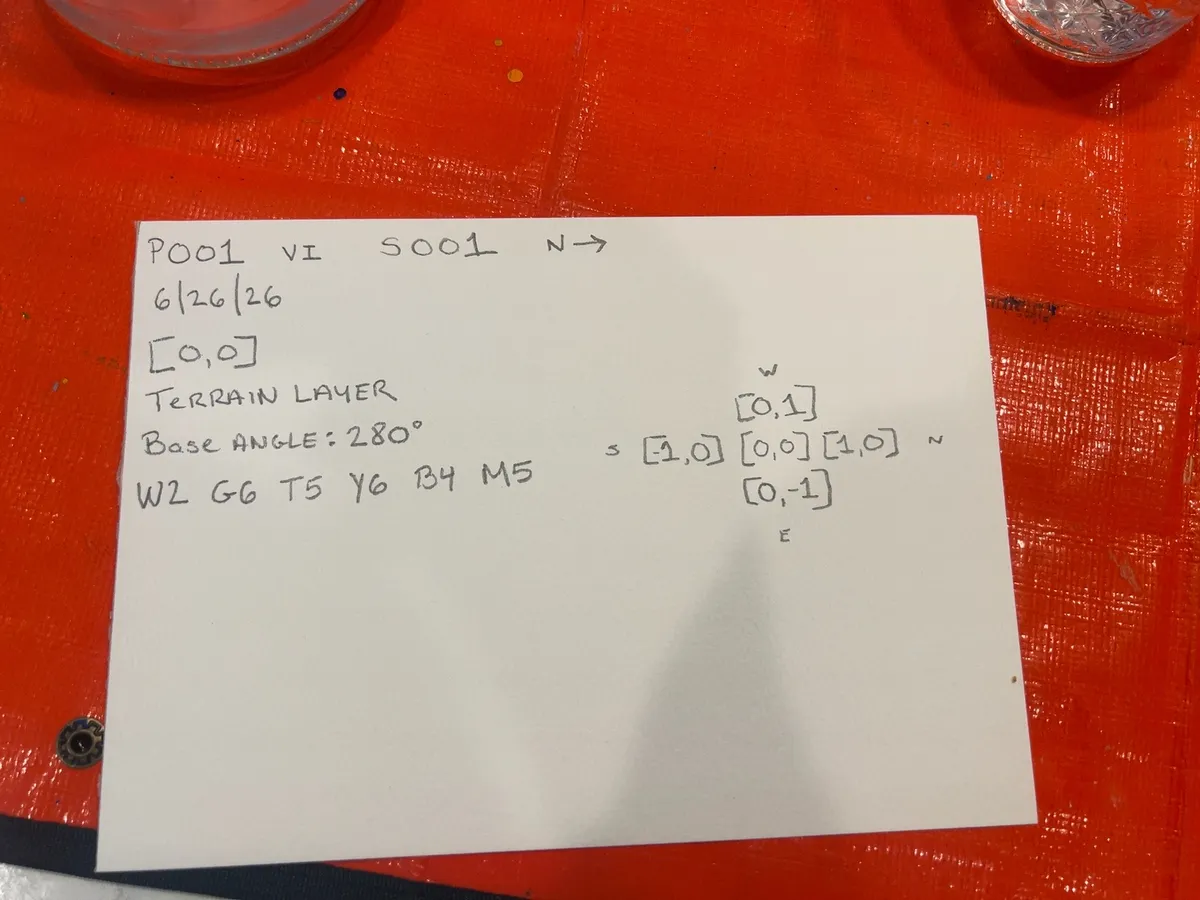 I also drew a tiny coordinate guide around the origin panel.
The Axis and Quadrants
Then I turned the paper over and marked the front.
The base angle was 280°, so I drew an approximate slanted axis through an anchor point. Then I drew a second crossing line to create four quadrants.
It was not exact. I estimated the axis and missed the center point a bit. Shaky hands, imperfect geometry, etc. I’m counting that as part of the randomness rather than a problem to fix.

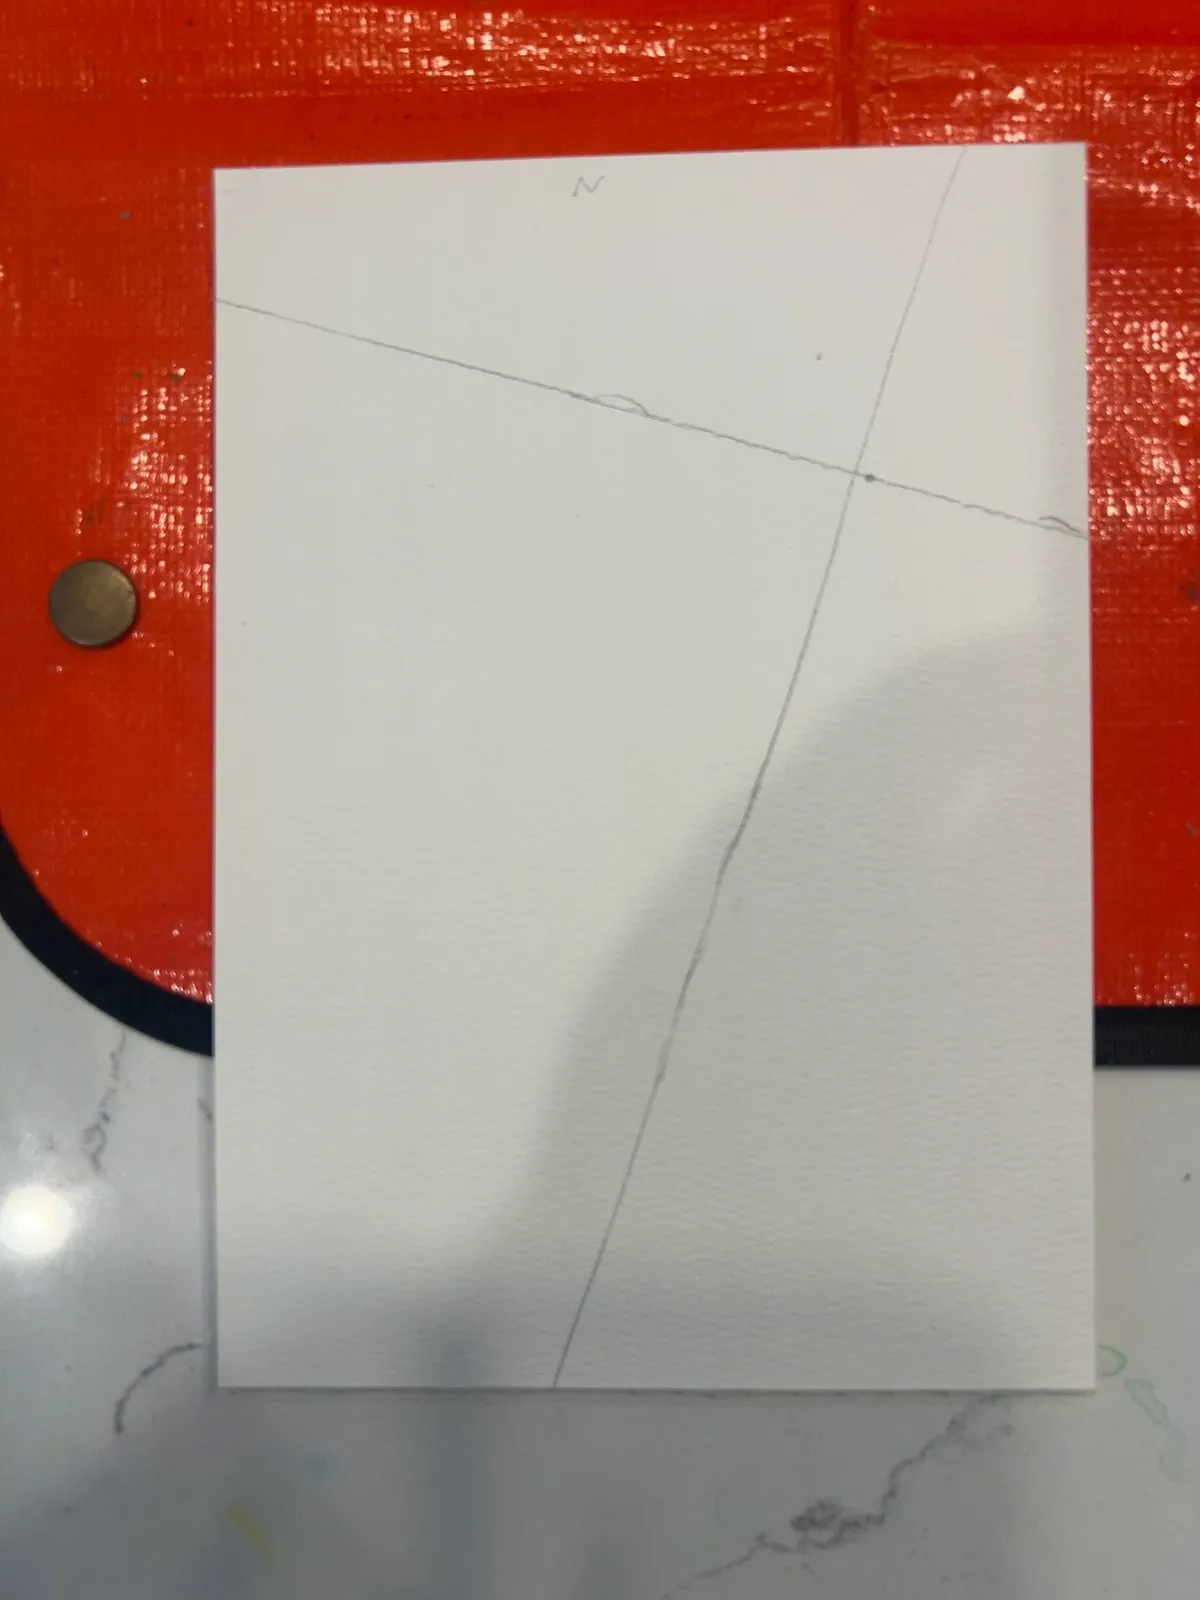
The small red die gave me 4, so the active area was Quadrant 4, the upper-left section of the page.
Interpreting the Roll
The roll gave me:
Wet-on-wet passage/break, stretched, bleeding outward, with texture marks.
That took me a minute to interpret. I knew I wanted the first panel to establish land and water, but the table did not say “draw a coastline.” It said passage / break.
So I treated the whole page as the wet-on-wet terrain beginning, then let the rolled result become the main thing the page was trying to do.
The First Terrain Wash
I started with a pale blue wash across the page. That made the whole thing feel watery right away, which helped.
Then I started adding green and earth tones to claim some land.
The green spread more than I expected. The blue claimed more space than I expected. The pencil axes stayed visible. The page got strange pretty quickly.
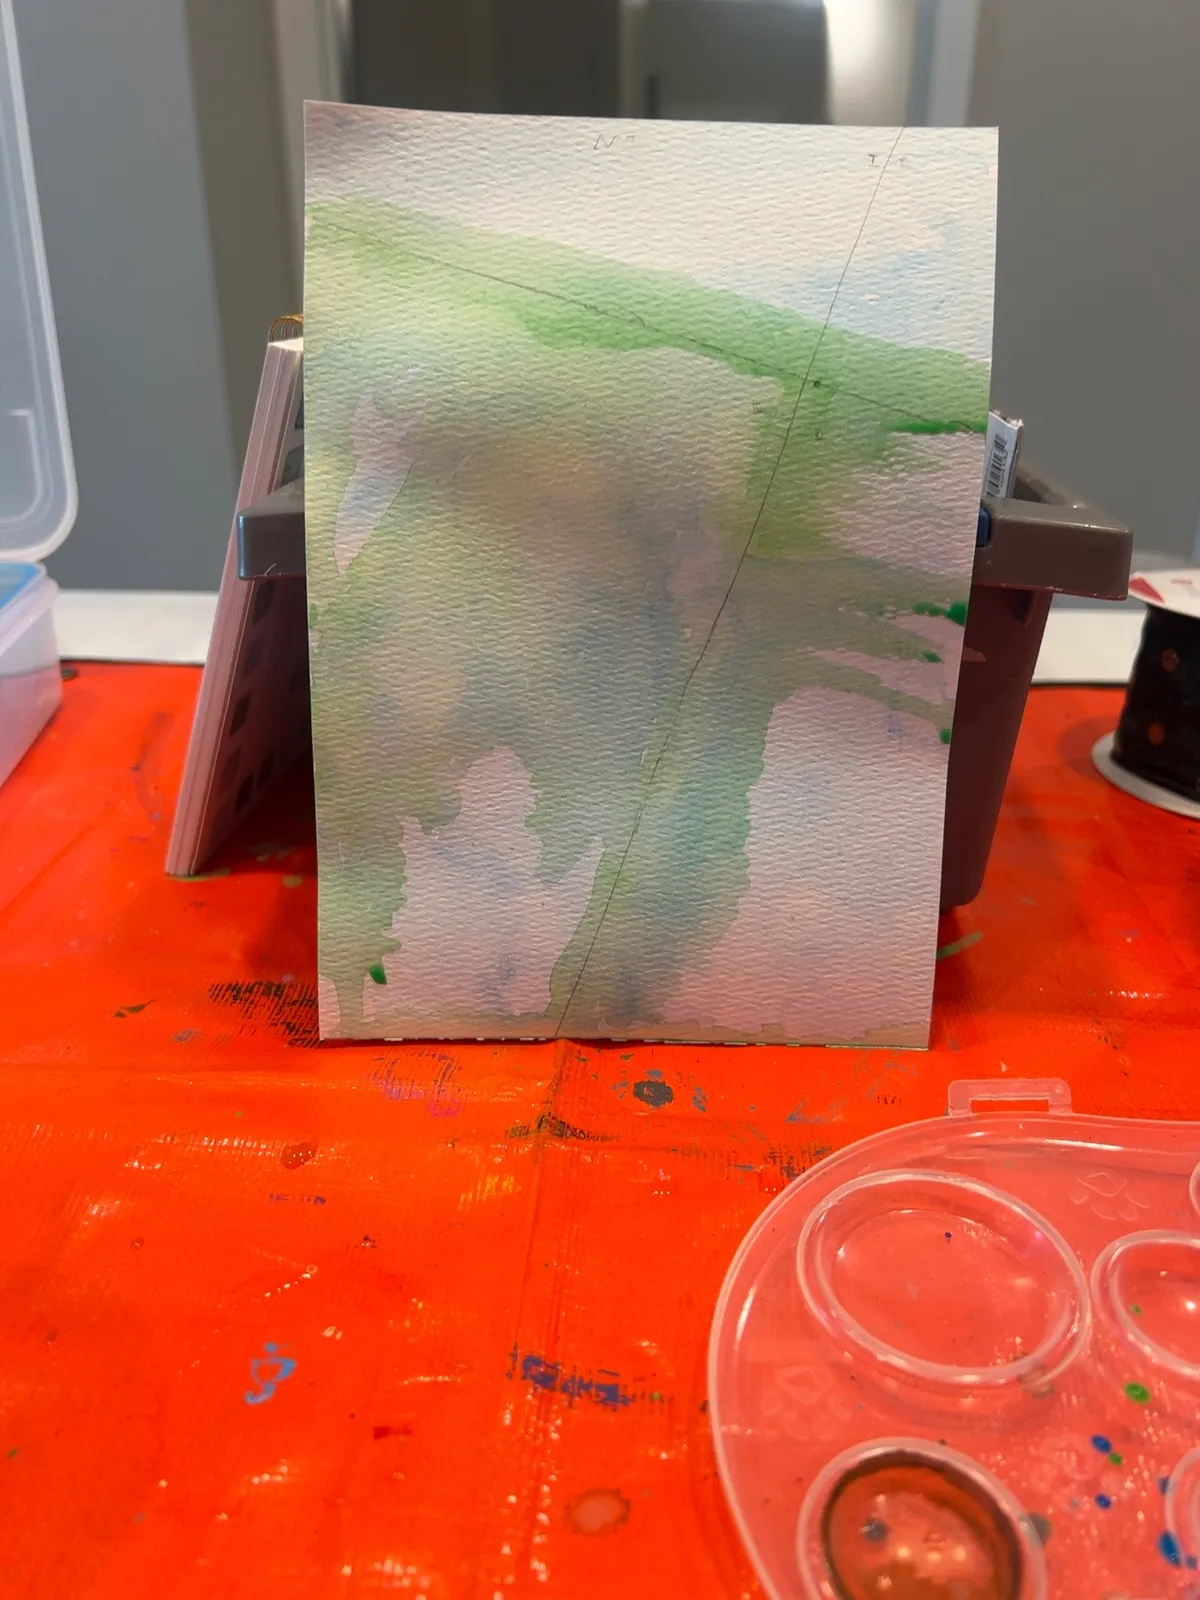
The Passage Appears
At some point I stopped being subtle.
The passage/break became much clearer: a larger bay or water body at the bottom, a main blue channel running upward, and a side branch moving to the right. The green started reading as shoreline, coast, marsh, or raised land.
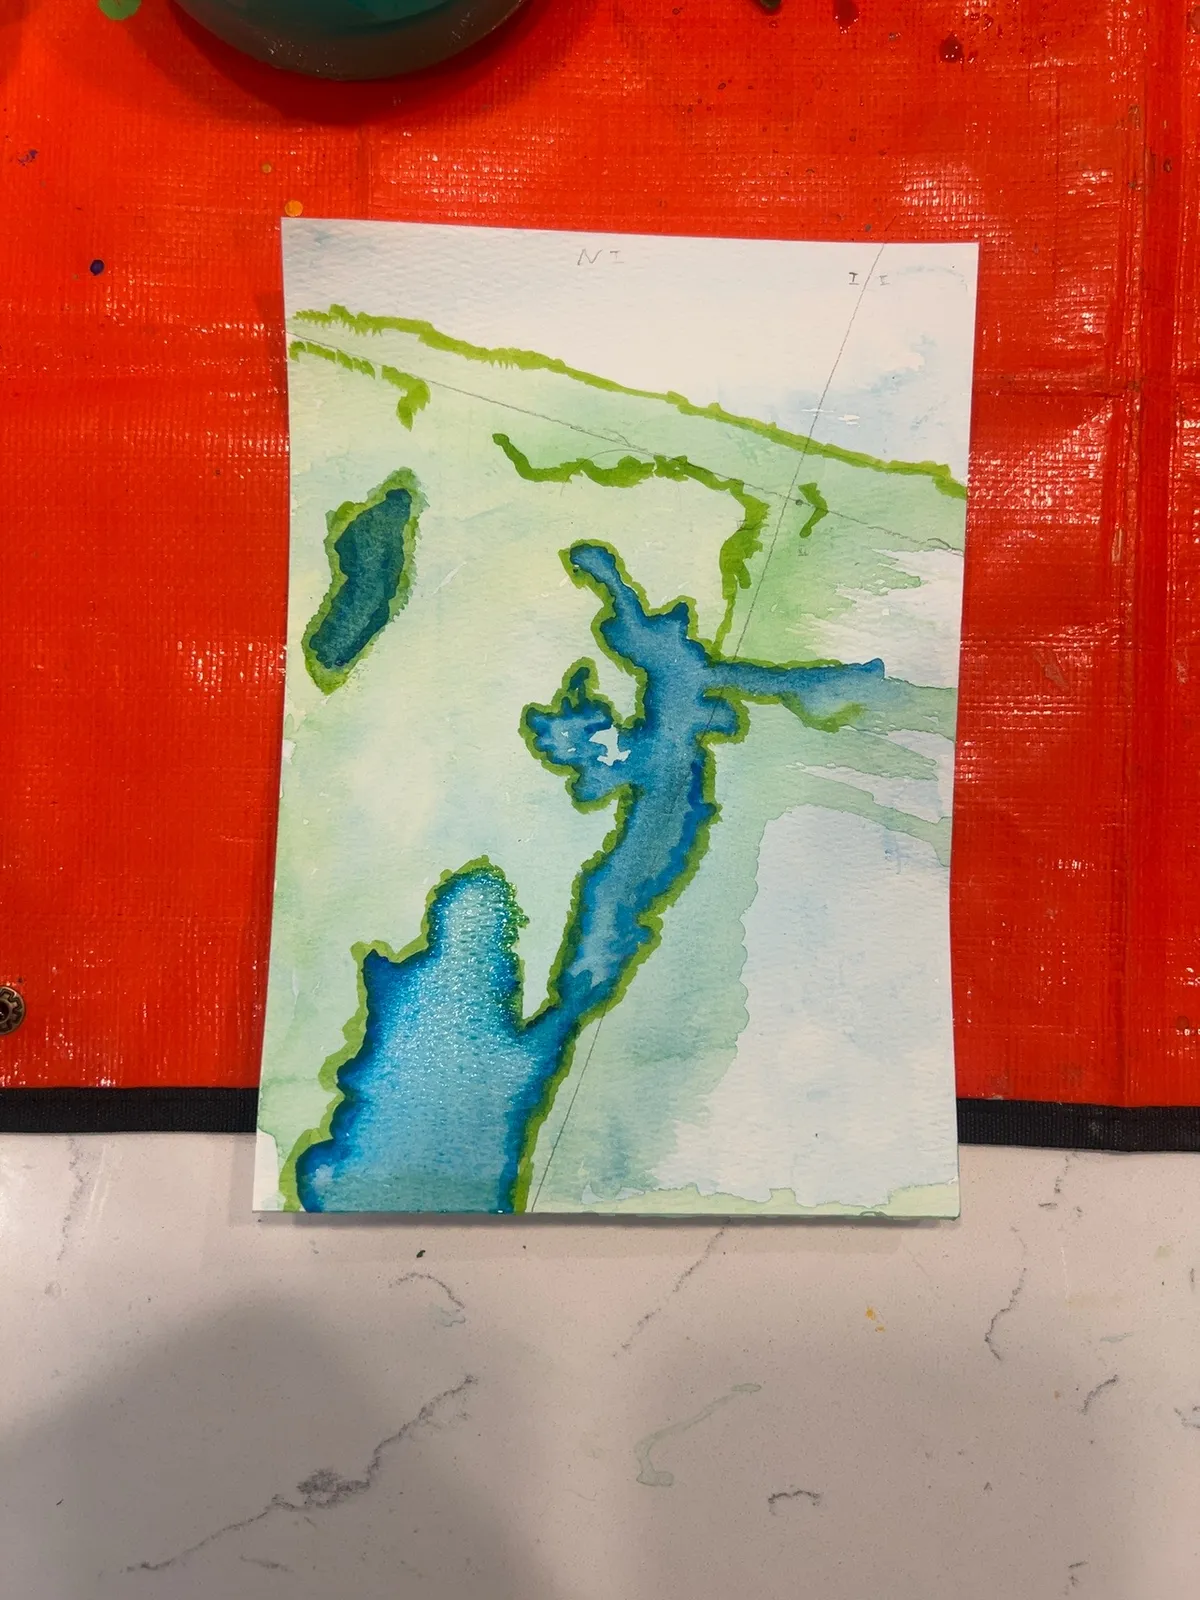
This is more defined than I expected for the first terrain layer, but I’m fine with that. It gives the next session something real to react to.
It is definitely no longer blank.
And now, that’s where I’m at. The paint is drying before I can continue with sketching or texture marks.
Current State of P001
Panel: P001 Session: S001 Coordinates: [0,0] Layer: Terrain
The next step is probably not more bold color. I think the painting needs to dry, and then I should move lightly into the sketch layer.
The next session should probably do only one of these:
- lightly pencil the most important shorelines
- decide what to do with the meta die result
- add the texture marks the roll called for
For now, P001 exists. And it needs to dry.
← Previous: The Basic Idea + Process